
Final Product
March 17, 2015
My Final Year Project for my animation course at Teesside University. Showing differences of hand animation to motion capture, as well as combining the both to create a hybrid animation for the best result.
Also comparing and getting motion capture working on a prop (skateboard) Along with technical rigging of the skateboard for better animation.
Final Year Project

Rig Methods...
February 25, 2015
When it has come down to the motion capture mixed with hand animation I have to link the bones and dummies in a slightly different way. Originally I have the bone still skinned to the board and then bone linked to either truck in the centre of their axis.
Now having the trc data linked to the board it will no longer allow to to link he bone to the board. So now so I can control the pivot of the board as well as it to use the trc data from the motion capture shoot I now have to link both trucks and the bone to the large dummy which is also linked by the trc. dummies and skateboard.
New Bone Rig Skateboard
February 20, 2015
A change in the rig from the previous model. Now only having one bone controlling the pivot of the skateboard. Making this a lot easier for the animation and the overall control.
Moving onto the Second Move...
February 19, 2015
Further progression on my FYP project ready to move onto the next move to compare with the animation techniques. I still have to go back to the previous move to clean up an animation snap on the motion capture file and to give them all the same scene and camera position to render out at.
The current move that is being cleaned and template awaiting to be created for the skateboard is ongoing. This move being an 'Ollie' which is more of a basic move in a skateboarding trick. Playing it safer for an easier move as deadline is getting close and I already had a lot of obstacles to get by with the flip tricks. The principles of cleaning the data and linking the markers to the board still stands the same.
This time without the battle of retrieving marker data through cortex which was a big problem when they weren't detected in the other trick.
Test Progression Renders
February 14, 2015
A test of all three renders together to compare each style and method of the animations doing the same trick.
Motion Capture / Hand Animated / Hand & Mocap Animation
1st Render Test Hand Animated Kickflip
February 13, 2015
A render test to see what my hand animated kickflip looked like comapred to the motion capture side. I will still be going back t tweak areas for the final product.
1st Render Test - Mixed Animation - Kickflip
February 11, 2015
Kickflip move, using a combination of Motion Capture from the actor and on the prop (skateboard) With a layer of hand animation on top of this.
One of three of my methods show in this video that I am undertaking.
Mixed Animation Progression
February 10, 2015
After deciding that the animation for one trick will be split into three different methods I have been taking my time making sure each one is visually correct and to find the answer to my actual goal (being 'which is the best way to animate with a prop').
Hand Animation
For the hand animated version of the move I still have some work to do on this piece. I have the pose to pose prepared for the timing as well as some basic animation between them. But for now it's an earea to look back on to complete. Focusing on the more challenging tasks ahead.
Plenty of reference has been taking for this part but it is also hard to see how fast I should be rotation the board and when the biped should land it. As skateboarding a a sport that thouasands of people do, everyone has their own way of doing the tricks. So I find that some people catch the board late as others flip the board a lot faster during the trick.
Motion Capture
Lately I have had a lot of trouble with the motion capture method. Not for the body motion, but the trc. data to control the board within 3dsMax. Multiple attempts have been taken in order to get the full rotation of the board working as I was only able to attach the board to one marker at a time.
This leading to set up more arrangement of dummies on the three main markers used. With this now attatched with dummies enables me to use different links to correspond with one another. Using a series of look at contraints from one dummy to another can then keep them all in line. Adding an extra dummy to link to the main one of the three, this is so I was able to connecto the skateboard to this. Now giving me full motion from the markers to the board.
This process has given me the motion from the trc. data yes. But I then had a very shaky board so I had to reduce many keys and dampen the data so I got less shakes using the curve editor and the filter options.
During the process of the clean up on the board I have finally got to the stage that if I try clean any more data or reduce any more keys then the board will no longer follow the data. This now leads me to the mixed animation were I will be able to fix this problem.
Motion Capture & Hand Animation Combined
Moving onto my final method of the animated skateboarder I have my mixed method. This method has been turning out the strongest of all three methods. Not because of the motion capture on the biped but the skateboard. I have founf that I have dampened a lot of the data as well as delete most of the beginning and end of the board. This is so I don't get the shake which was the main problem during the motion capture version. During this method I only have as little as nearly 20 frames using the motion capture data on the board, making sure I get the speed of the board rotation to then animate the landing by hand.
Rigged Trucks. Completed Skateboard!?
February 3, 2015
After a serious amount of rigging produced on this board I now believe I have finished the final part of the rig. By skinning each truck with a Bone IK and then connecting the bone to the board using a Link constraint ables me to now have full control over the trucks.
My next goal is to now polish both hand animation and motion capture using these trucks in the scene. Then to move onto the combination of the two methods.
Motion Builder Footage
January 31, 2015
Video Capture of the Kickflip animation. No board markers involved.
Showing the placements of the markers with the actor scaled & showing unused marker data.
Motion Builder Process
January 31, 2015
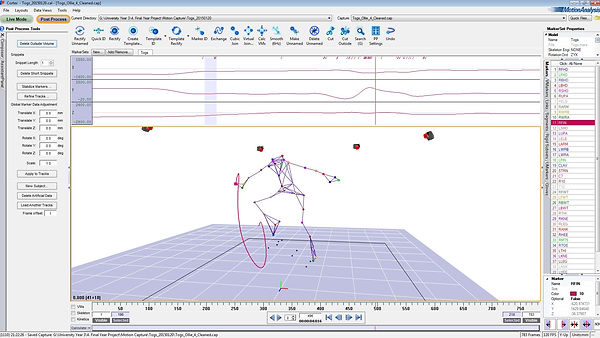
Now with the cleaned Cortex data I was able to send the data through into Autodesk Motion Builder.
Having my trc. data now in the scene an actor is now abled to be scaled to this to see the animation on an actor. So starting off I have scaled the actor to the best fit of the marker data, this is so I am able to get a better response from the data to the driven actor.
Scaling The Actor...
After scaling the actor awaiting to be driven from the marker data I have assigned the data to certain parts of actor. This is called the 'Marker Set' For Motion Builder not all data is needed to control the parts of the actor. Some data can be used in more than one area if it relates to that limb. But I found that it sometimes corrupted the animation slightly so I missed out some data also.
Above is a snap of the areas I have used of the data in the marker set.


Board Makers & Problems
January 31, 2015
During the motion capture shoot I was able to capture the board quite well and got perfect reaction and movement from it. Going back to my data I added a New Marker Set for the skateboard, this is now abled me to use this template of the skateboard to use in all of the other trc. data that was captured.
Whilst during the clean up of the skateboard trc. data there are long sections during the frames were the board markers have not been picked up during the shoot. So with the markers being invisible had made it very hard to clean up and retrieve this data. After a few hours of testing various methods using 'virtual' & 'Linear' Joints as well as many others, I was able to get back a solid 6 out of the 8 markers during the cleanup.
I wanted to have a file with good cleanup but this will have to do for now. Mainly because I am only going to be needing 3 of the markers for the skateboard. This is so I can use the data of Rotation and Transition data.
Cortex Cleaning and Board Markers
January 31, 2015
Now the shoot has been completed I have the data I need to carry on with my project. The process of cleaning the cortex data is ahead as well as the board data I captured. The next process from here will be taking the data through into 3dsMax were I sahall also have the data rigged and linked to my skateboard in the scene.
Also captured here is the flow of the entire motion of this trick (Kickflip)
Video of the Motion Capture shoot
January 21, 2015
Reference photos of Motion Capture markers on the day of the shoot.
 |  |  |  |  |  |  |  |  |
|---|---|---|---|---|---|---|---|---|
 |  |  |  |  |  |  |  |  |
 |  |  |
Talent for the motion...
January 16, 2015
Recently being in contact with Nigel Potter of '4 Motion Darlington' (skate park) he has kindly directed me toward a member of his staff and a very talented skater, Ian Ashley (Togs) who will be acting as the talent for the motion capture shoot coming up.

Change of Plan...
January 16, 2015
Recently having a project review with my Final Year Project module tutor as well as a second listener, a change of plan in my project has needed to occur and by doing this makes my project a lot more solid and safer.
Instead of doing just a hand animated piece, the project will now be halving the set list of animations from the original piece and compare this to motion capture. Having booked a motion capture session for Tuesday 20th January I wish to have the set list captured, photographed and recorded ready to carry on with my work.
The reasons for doing this is so I have a comparison of animation that shows a prop being used, whether I am capable of hand animating this better or to see if motion capture if the more helpful solution to my task. A second reason for changing the Idea is so that I can get a better understanding of motion capture, methods used and the software itself. Starting with Cortex to capture the data in the motion capture lab, to then bring through motion builder and finally have the data onto my character in the scene.
The set list of moves will be the same for either side of the animation. This is so the comparison of the moves can be made. So visually as an example, one side of the screen will showing the hand animated trick as the other side shows the motion capture of that trick also.
More Dummies...?
December 3, 2014
During the process of more test animation using the new rig there has been a concern thinking if more control points are needed on the skatebard. So two more dummy controllers may be added to each kicktail of the board (this is the lip of either end).
By doing this the board may be controlled on these pivots to make the animation of flantlanding possible. As when flatlanding on a skateboard thse ends are used a lot to contol the board itself and to do these tricks.
Above is a shot of the two extra dummies that may be added to the skateboard for extra controls.

Wheel Animation...
December 3, 2014
More Dummy Control & 'Out-Of-Range' Curve Editing...
DUMMY CONTROLS
By recently rigging the skateboard with the dummies that are able to control the skateboard from both of the trucks. More links have been added after this for the control of the wheels and having them able to spin.
By doing this It was done by simply detaching the wheels and seperated them into two groups, these being a pair for the front two wheel as well as the back two. With these wheels in their own groups, a link contraint was then made to the smaller dummies located on the trucks. Thereore when I have both dummies selected a rotation can be given to each pair of wheels.
Another video below to show the new kickflip which was able to be animated within a minute. This by using the rig.
CURVE EDITING
When it comes to animating the wheels of the skateboard a more simple solution has been thought of involving the curve editor. Recently learning this method in an advanced animation session it will come in handy for this project.
By planting a key at the beginning or the timeline and then a key further down with a full 360' rotation of the wheel would be the starting point of getting the wheel in motion. The curve editor has then come into play using the 'Out-Of-Motion'
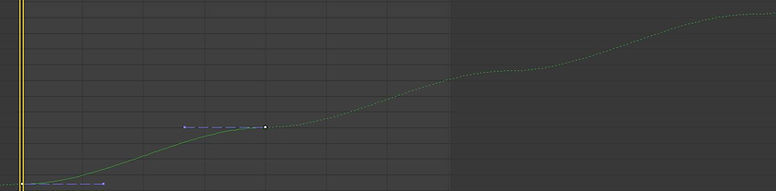
Below is a screenshot of what the range of motion will look like with the two keys set (Fig.1). Carrying on with this method the out of range can be applied for a continuous loop of the animation.
(Fig.1)
Now having the keys set and the curve editor open, the 'Relative Repeat' type (Fig.2) may be aplied. This causing the keyed animation to continue until the end.
(Fig.2)
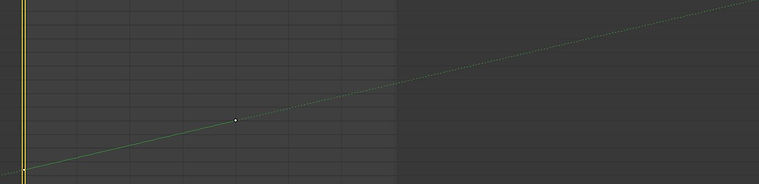
By applying this type you can see that the curve is continuing on and on, constantly climbing through the curve editor. (Fig.3)
(Fig.3)
Noticing the dip from each keys that have been applied and that the whole cuve is in a slight wave. This is now causing the wheels that are keyed to slow down thinking it is slowly blending into the next 360' rotation.
This isn't the look that will be wanted as a continuous loop is wanted for this animation. So by applying the 'liner' option in the curve editor will give this a constant climb and the animation wont be slowed down at all. (Fig.4)
(Fig.4)


Rigging
November 25, 2014
Reason for rigging...
The reason for wanting to rig the skateboard is beause I am wanting to have two pivot points on the one object. This theory is by wanting two parent dummies to control the skateboard, which cannot be acheived. So instead I have tackled another way around this...
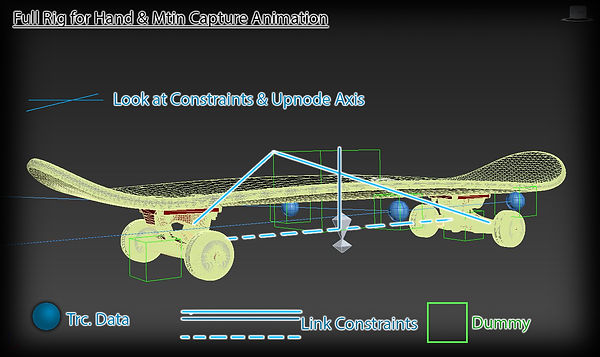
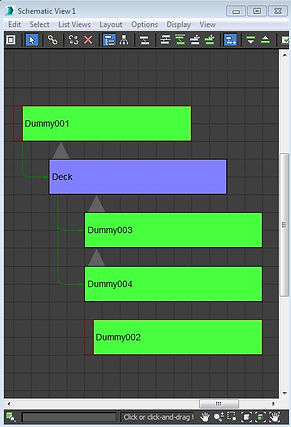
The Rig...
Here we have the skateboard without any control points or dummies with the pivot point aligned to the centre of the object.
In the next Image I have shown which dummy is linked to where. Using link and look at constraints.
The diagram is indicating the dummies and their links to each other. The two smaller dummies marked #3 and #4 are both linked to the skateboard deck. With another dummy marked #1 which the board is linked to. Finally having the final dummy marked #2 that has a look at contraint to dummy #1.
These dummies are set up like this so that each end can be rotated and moved using either of the larger dummies (#1 & #2)
The next image is showing the first rotation by controlling one of the two main dummies.
Next in the sequence is rotating the second controller of a dummy rotating the skateboard higher up. But noticing that a Dummy is being left behind whilst doing so. This dummy is linked to the world rather than the object one frame before wanting to using this dummy again as the main controller. So then they key after is when I would link this dummy back to the object once aligning it back to the other dummy inside it.
Dummy being left behind (See image above)
Dummy aligned back in place and keyed ready for the next rotation. (See image above)
Link Parameters showing which key the dummy is linked to either the world or its parent dummy.
(See image above)


Animation Problems
November 25, 2014
Tackling the situation
From previous tests working with the skateboard I found that hand animating the skateboard was quite a tricky task. This being because I had to keep the pivot point in the centre of the board. As before I tried to change the pivot point during the first animation, to find that it cancels out the previous keys made for the positioning of the board itself.
So by doing this when I started the animation with the pivot point on the back wheels, then to change it to the front wheels. I found that the previous keys were following the pivot from the newest one set.
Finished Prop
November 15, 2014
A render showing the finalised skateboard which will be used in my animation.

Animation Prop
November 15, 2014
As I am creating an animation to do with skateboarding I obviously need a skateboard. Having a basic version modeled for me so I was able to do an animation test to see if I could accomplish this. I then went on to downloading a finished model online using 'Turbosquid'.
I managed to find a good model but needed a bit of tweaking. This also needed to be unwrapped in areas that I wanted to add my own graphics to.

I have also used the material editor and components such as 'Arch & Design' for the texture of the trucks, wheels and wood for the skateboard. Testing the reflectivity with the floor and in the scene I was finally happy with my choices. All that was left was to add the desired graphics.
These areas being the grip tape of the skateboard and the graphic for under the deck itself. Finishing the model I am now ready to rig and animate the skateboard scene.
